Tuesday, November 30, 2010

Nominate the Global Learner Blog for Edublogs Best Group Blog


I've just nominated the Global Learner blog as the best group blog this year for the Edublog Awards. The way you nominate is to create a link from your personal blog to the Edublog webpage. Let's get as many people as we can to nominate and vote. Go to my blog to see the example.

Let's Graph it Up!


As a collaborative project, Liz Springer and I decided to have our students respond electronically to work that our students posted to our classroom blogs. My math class created digital graphs using the website http://nces.ed.gov/nceskids/createagraph/default.aspx. The students created a topic and then surveyed other students in the 5th grade. They compiled their data, created a frequency table, and used the previously mentioned website to construct their bar graphs. The graphs were downloaded as a jpeg and then posted to my classroom website. Their digital products were very professional-looking and they took great pride in creating a graph that looked as thought it came directly from their text books.

They especially enjoyed customizing their graphs by creating 3D versions and altering the colors, but they also had to determine the interval and create labels for their work. The students then developed questions, which they posted on the blog alongside their graphs. Students from Ms. Springer's class then analyzed the graphs and answered the questions. Overall, the project was a success and I would love to collaborate with other teachers and Global Learners on future projects.
-Robbie Robinson

Monday, November 29, 2010

Is it almost December?

I can't believe that the month of November is almost done! I am so thankful to be a part of the Global Learner project and am impressed with how much technology I have integrated into my classroom. (Patting myself on the back right now.) :)
So far I have started a classroom blog that my students and I both regularly post on.
I have created smartboard lessons and have used my response clickers almost daily. Overall though, I have exposed my students to technology and have given them opportunities to further their global presence.
I am really looking forward to the upcoming months and am ready to accomplish some technology goals that I have set for myself!

Fifth Grade Collaborative Writing Blog

Colleen Urlik (at Kemp) and I (at Central) put together a blog where students from both of our classes can read, comment, and collaborate on writing projects. My class started by writing the weekly writing project, a paragraph describing an interesting place. Then, Mrs. Urlik's class read each blog and posted comments on the paragraphs. Next, Mrs. Urlik's class will post a winter poem that each student wrote. My class will then read and respond to them. The kids love having their work published this way and it's a great way to have them help each other revise & edit. The blog is also open to other comments, so our students would love any comments, ideas, encouragement, etc.

http://palmer5th.blogspot.com/

How are you using Google For Educators?

We didn't exactly get to learn much more about Google for Educators at our last Professional Develop on November 17th. Everyone wanted time to work! So, if you are interested in learning more about Google for Educators, here are a few resources.

Keep the discussion going, please share how you are using Google For Educators. We'd love to hear it!

Free Technology for Teachers - Google Tool Tutorials - numerous tutorials for blogger, websites, maps, quiz creation, and much more.

Adams 14 Instruction Technology Site - This site was used at our PD on the 17th. Included on the Google for Educator page is a "How to Create a Google Site" by Doug Abshire.

Tuesday, November 23, 2010

Check Out My Lesson

I would like to share a vocabulary lesson for week 1 of Storytown. I modified an existing Smart Exchange lesson using "Rope Burn's" Robust Vocabulary. I've used this Smart Board lesson as a template for many subsequent lessons throughout the Storytown curriculum. The "context clue" section can be somewhat time consuming, but it can easily be excluded based on potential time constraints, or age level considerations. The lesson can be conducted quickly, but feel free to play around with some of the utilities. The pages devoted to specific vocabulary words contain tap-to-view slides and a link attached to the actual vocabulary word to its dictionary.com web page. I submitted the lesson to Smart Tech and it should be available within two weeks, or you can download it here in the meantime.

http://exchange.smarttech.com/details.html?id=x2d5a2d4b076040d39f23d4c91ba9c416

Enjoy!

Robbie

Monday, November 22, 2010

Increasing Engagement

So, after working with Jim at the Global Learner PD yesterday I decided to start using the Smart Response System as more of a mid-lesson engagement activity. By using the "Anonymous" mode, I have started using the true/false and yes/no responses in order to gauge student understanding. For example, my class was focusing on proper and common nouns this week and I was able to use the SRS system to quickly mandate student engagement and check for understanding in one fell swoop. The students don’t need to be signed in, so this could work well for primary grades as well. If anyone has any other intriguing ideas for SRS engagement, please let me know!

Saturday, November 20, 2010

November Blog-Welner


As November is coming to a close, Ms. Taylor and I will be collaborating on our film project. As I mentioned previously, the children have finally completed their biography Theme 1 projects. All the videos can be found on my wiki under http://welnersroom28.wikispaces.com/ . This proved to be a great fluency project, as the kids wanted to perfect their readings on the LifeCam recordings.
I also made a sheet for the students to fill out while watching the films for engagement. They need to list three facts for each biography they hear. This will give the students an opportunity to improve listening skills, and then share with a partner on their findings. (see above).
Ms. Taylor's class will then show their movies and she will then supply all students with a summary sheet using the five finger summary.(see above)
This activity will be a lot of fun for the students and I am sure they will be motivated to make more movies using literature and research. What a great way to get children excited about learning!
I also will start my next Theme 2 Project on Common Goals with the kids, which is also presented on my wiki. Our next project will involve using Kidspiration to plan and organize a historical event and make and present a powerpoint on either the Revolutionary War, Gold Rush, Westward Expansion, or The Depression. Some of the kids have some experience with Power Point and others do not,so we will see how it goes!


Wednesday, November 17, 2010

Creating Stories Can Be Social, Fun and Easy!!


For my collaborative project I created a digital ABC story with my colleage using fun graphics on StoryBird.com! This is a FREE user-friendly website that parents, teachers, and students can use to create a digital story.

Each of the kindergarten classes chose 13 letters and found graphics to match each letter. This was an engaging literacy activity to do during whole group instruction. In order to hold students accountable I had students write the letter that we were working on as we were making the page on StoryBird.

I am already planning to make a digital story for each vowl. My students enjoyed picking graphics and creating the text for the story!

The kids loved it and so will YOU!
Unit 2 Final Project
This was our second project to involve photo story and Microsoft publisher. This project seemed to be much better for the students than the previous project and we think this was due to a number of key differences. We learned in our first attempt at helping students use these two technologies that we needed to be much more specific in our expectations and we needed to provide greater support as they work through the project. We decided to structure the lesson with a “business proposal” that students would have to fill out step by step and “submit” to us. This helped students plan their work and provided them a structure to work within. This also helped us check student work to make sure they were on track throughout the lesson and see where students needed more support or help. Another key difference between the projects was the fact that most students were familiar with the technologies because they had created a project in both formats in the past. Students seemed much better prepared to work with the computers, spent less time with questions and procedural issues, and were better able to explore and utilize the options in each program. On the second project, we also gave students three distinct skills to choose from and allowed them to choose which program, photo story or publisher, they wanted to create their project on. Students were able to modify this project for themselves because they knew what skill was best for them and which technology they were most comfortable with.

You can see the student projects by clicking this link: http://math6block5.pbworks.com/w/page/32183496/Unit-2-Final-Poject-showcase

Glogster


I have been using Glogster as a center during reading for high students.
These students often get done with their work quickly, so I have offered them the opportunity to create a Glogster on one of the stories we read in Theme 2 of Storytown.
So far only a few students have created one, but the others remind me DAILY that they haven't done one and want to! I have found that this works well as a center. Here is an example of one that was created on the story Dogs.

Collaborative Project


My 2nd grade class did a collaborative project with Ms. Booth's class.
The project required students to work in groups and write a story problem using either addition or subtraction. We have been working on identifying key words (if there are any) in story problems, so students also had to include one key word. When students finished their "rough drafts" of the story problems, we put them in Smart Notebook and decorated their slide. After we created the story problems, I sent them to Ms. Booth's class to solve. In return, we received the story problems from her class and my kids loved solving them! They were excited to be working with a 2nd grade class at Monaco!

Computer Lab

My school just installed a full computer lab and I just had my first experience with teaching a whole class computer lesson. It did not go as I expected at all. I was trying to teach a lesson on making a PowerPoint presentation, but many students in my class do not have basic computer skills! Needless to say, we did not get very far. We only saved our files on the S drive. Tomorrow, we are going back to basics. To be continued...
My mentor and I just finished our collaboration project and it went really well.

The objective for the lesson was for the learners to practice multiplication and division by creating and solving problems.
I gave each of the students a graphic organizer with five boxes, one for the question and four for the answer choices. Then I modeled creating a story problem. I showed the students how the graphic organizer correlated with the way I enter questions into the SmartResponse software. Then in groups of two or three the students created their own story problems and we entered them into a clicker quiz. My mentor was going through all of these steps as well, so when my class finished creating our quiz, we traded and took each other's quiz!

Taking the quiz that Ms. Sealy's class created really helped with the classroom engagement. Knowing that they were taking a clicker quiz created by other students made it a more authentic experience and made them "buy in". As they took the quiz they solved their problems on their white boards and signaled their responses. The results turned ou really well, with a class average of 83 %. The students are excited to be a part of creating more of the quizzes that they take.

Subtraction with Regrouping Lesson

Before I knew of The National Library of Manipulatives I created a smartboard program that taught my students how to subtract with regrouping. (Using unifix cubes.)
Overall, the kids enjoyed the lesson and were engaged throughout. After I showed them how to borrow and regroup, I had the students go to their seats to use whiteboards to practice subtracting, in a we-do format.
Since doing the lesson, I have been quite impressed with my students' subtraction with regrouping. They have been able to reference the unifix cube lesson and seem to apply what they learned weeks ago!
I'm thankful for the smartboard in many ways, however with this lesson I think I was most thankful. Last year, I did the same lesson with real unifix cubes. Instead of ungrouping them and moving them to a new column on the smart notebook page, I broke the cubes apart and put them into different pockets in a chart. PHEW. Last year it was a 'clunky' lesson that didn't flow, which inhibited the kids from truly learning the concept.
Yay for math.

Collaborative Blogging Part 2 HighSchool Meets Middle School

So.. the second part of the collaborative blogging between Doug and I is currently underway.  His IB Science and Honors students are now replying to the short constructed responses left by my sixth graders, giving feedback and essentially critiquing their responses... right now we have 300+ responses.


A couple of technical details.. We moved the blog over to wordpress so the new updated address is http://acms6thgrade.wordpress.com/  

We moved this over because we discovered that through blogster, you couldn't reply to individual comments directly.  At wordpress students are able to give each other feedback, replying directly to individual comments.

So for example one of my students (on the left) posted their response to the prompt and then Doug's students have replied giving them direct feedback.  In this case the followup posts were supportive and gave ideas and critical feedback directly to the sixth graders. 

Hi all. Doug here. Just wanted to give Jim and his students props for creating the blog. This is the first time that my students have had the opportunity to interact with a blog created by the middle school. I look forward to cultivating this relationship between HS and MS over the next few months!

Math Night @ Monaco Elementary


In October, Monaco Elementary held its annual Math Night where parents were invited into the classroom with their children to experience how we teach math. For the fifth grade presentation, we created and “I do” to teach how we create patterns using shapes and displayed how they progress with each step. For the “You do,” we allowed the students and parents to choose their shapes and create their own patterns on the Smart Board. The patterns were saved and we allowed other students and parents to manipulate the shapes in order to develop an answer. The activity was very simple, but incredibly effective in engaging our guests.

Tuesday, November 16, 2010

Storybird.com


Miss. Czaja and Mr. Giles' classes worked together to make this awesome book for our collaborative Global Learner project. Each of the classes chose 13 letters of the alphabet and found graphics that match each letter. Then, the classes shared their part of the story with the other class to help them edit each other's book. The online book features awesome graphics that were found on the Storybird website. Storybird is a free website for parents, teachers and artists. All you have to do is find a theme that you want to use and create text for each page! It's as simple as that!

If you have any questions, feel free to email us! And if you want to check out our story, click on the following link!

Can You Help Me Learn My ABCs?

Monday, November 15, 2010

WordSift - Change up your vocabulary teaching


If you would like an alternative to introducing text, vocabulary or content, check out wordsift. This word cloud generator is from Stanford University and has many options for analyzing text within a word cloud. Words can be organized alphabetically, common to rare, and rare to common. You can even look at common words and their uses within other content areas. Here is a sample lesson about a letter from MLK sent from a Birmingham jail.

Once you sift your words, you can 50 common words from your text, view google images, visual thesaurus, and words used within sentences from the entered text.

This site was created to help all teachers become effective teacher of vocabulary! Check it out. Would love to hear if you try it in your classroom. Click here for a video tour.


Sunday, November 14, 2010

Water Cycle SmartBoard Lesson-With United Streaming Embedded Videos

To introduce my sixth graders to the water cycle, review prior knowledge, and launch our water unit, my content team-mate and I modified a pretty nifty smart board lesson we found on smart exchange. 

I know a lot of my sixth graders have been taught the water cycle before, but after running a response clicker pre-assessment, I discovered a wide disparity in their knowledge levels regarding the steps of the water cycle and their ability to describe gain/loss of energy at each step.  With that in mind, my teammate and I began designing a lesson that would work well for both first time instruction and review.  We both realized that engagement would be the key to making this work for the students that had already mastered the content. 

The water cycle review lesson we found on Smart Exchange seemed to be just the vehicle we were looking for.  We tailored the lesson for our specific use, but the main structure as built really worked well for us.

Initial Sort
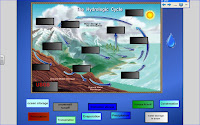
The lesson began with an old fashioned sorting activity where students had a blank unlabeled water cycle printout at their table and an envelope with cut apart labels for each step.  We had a notebook page version of the same thing up on the smart-board.

As they worked in partner groups to place the labels on the handout,  I walked around the classroom and handed the smart slate to various groups and asked them to drag terms to the appropriate location on the smart board.

When the class was completely finished, they compared their work with the completed smart board page until the both eventually looked like this (completed sort):
Completed Sort


The next step in the lesson was to have the students setup Cornell notes in their science journals.  Each step of the the water cycle was listed on the left side of their notes, with the right side reserved for descriptions and details.
name chooser

Now the great thing about the water cycle is that is does not matter where we start, so I used a random name chooser (random word chooser object) to select a student to come up to the board and click on the step of the water cycle they wanted to start with.

precipitation
In the notebook file, each of the labels links to a separate page with more information about that specific water cycle process.  For example, lets say that Karen's name came up on the random name chooser.  She would go to the smart-board, click on  her choice of water cycle process "precipitation", and this is the page that would appear:

Random students were then selected one at a time to come to the smart-board and match a picture of precipitation to its labeled name type on this specific page.


Now here is where it got really fun.  The precipitation label at the top of the page was linked to a united streaming (US) video clip on precipitation. When the precipitation label was selected,  a corresponding video clip describing this water cycle process was played on the smart-board.  Although the clip from US was fairly basic , the students were pretty amazed by how this worked


Once the clip was played, we created a short definition of precipitation including the types and using a document camera, put them into our Cornell notes.  For this particular process of the water cycle our notes now included a description of the process and specific examples.

The same steps were repeated for the rest of  the water cycle until the students had watched clips, reviewed key ideas, and taken notes for each of the key processes.

After we had walked through the entire cycle, I used a vocabulary sort object, as a formative assessment, to review everything one last time.  I had a set of envelopes ready with both terms and definitions cut apart.  The students worked in pairs and used their notes to match each term and definition.  When a partner group had completed their sort, I passed around the smart slate to have them match one of the terms to a definition on the smart board version. So essentially the sort was happening at their table and on the smart-board simultaneously.

Once everything was sorted, we checked to make sure that everyone had everything correctly matched and made any corrections.  Then for the coup de grace, the very last slide of the notebook linked to a you-tube song on the water cycle cool water cycle song (you have to watch this if you get a chance!).  While this played I did this crazy little dance and with a lot of kinesthetic motion.  The kids just died with laughter.

So, a couple of reflections on this lesson...

  • The engagement was through the roof.  I figure that I was able to get well over half of the class up to the smart board at some point in the lesson.  The method of delivery worked well for both first time instruction and review.

  • I liked having the smart slate for walking around the class allowing students to interact with the presentation from their seats.  I tended to use this for when students were working independently at their seats, and shift to having students come up to the large board when I wanted everyone's attention and I was directing class.
  •  Using the smart slate was difficult for some of the students.  They had a hard time coordinating their motions with what was occurring on the smart-board, but got better over time.
  •  The random word chooser was great in having fairness for participation.  Prior to using this, students were complaining about not being called up to use the smart-board, or were blurting out for "their turn" 
  • Making sure notebook pages linked correctly was a little annoying.  I thought I had everything set and it was frustrating to find a few glitches once the lesson was underway.
  • Note-taking was much easier (i.e. they were all doing it) when they knew that they would not be able to go up to the board if they were not caught up.
Thanks for taking the time to read all  of this... Any and all feedback is appreciated.

Saturday, November 13, 2010

2nd Grade Collaborative Project!

Sara Zaleski and I are a GL mentor/mentee team who teach 2nd grade, so it was only natural that we collaborate on a project together.
First, Sara had her students write story problems. Then, she made a Notebook slideshow with the problems for my students to solve.
So, we did just that!
My students sat at their desks with white boards while I moved about the room with my Smart Slate.
The kids solved the problems and showed their answers on their boards while I wrote their answers on the pages of the notebook file.
I saved the file with the answers and sent it back to Sara, for her class to see HOW we solved their problems and if we solved them correctly :)
Then, my students created story problems for Miss Zaleski's class to solve. First, I explicitly explained HOW to write a story problem that included two characters, an object, an operation and a question at the end.

My students worked in teams of three and created some very creative and puzzling story problems! They were eager to choose their background color for their slide as well as clip-art that would compliment their problem.
Overall, my class was excited to show off their math skills for Dupont's second graders and are looking forward to hearing back from Ms. Zaleski's class about how everything went.


Overall, my lesson went well and my students were engaged throughout. They LOVED making their own story problems and thoroughly enjoyed working in teams. It has encouraged me to have my students create more math problems of their own. This upcoming Wednesday we will be creating MORE story problems for our fellow second grade students at Monaco to solve, which I know will be a success!

Friday, November 12, 2010

This Land is Your Land... this song is an earworm.. and it has been stuck in my head for 3 weeks!! HELP!

My 5th graders have been working on a unit about Woodie Guthrie... exciting right? I was so worried it would be meaningless and difficult to build knowledge around this topic. Aimee and I worked on another edusymphony in order to build vocab and background knowledge.. and it worked WONDERS!! The kids were SO excited about Woodie Guthrie, the Great Depression, and the Dust Bowl... who knew? Technology can make such a difference in motivation and inspiration it is almost unbelievable!

Haha.. anyways... at the end of the unit, we decided to make a music video to Woodie Guthrie's most famous song "This Land is Your Land". We used Movie Maker to do this and the kids were so excited about their final product. The thing I'm having trouble with is trying to fit all of the fun technology projects into my short block with the kids in addition to intervention. It isn't always the most organized scene, but they have a good time and hopefully take some inspiration and knowledge away from it. Enjoy the music video below! Hopefully it won't be stuck in your head for the rest of the day!


Thursday, November 11, 2010

TOK: Theory of Knowledge (IB)


TOK: The structure of DNA

"The story of the discovery of DNA illustrates how communication between scientists is critical in the growth of knowledge. The discovery of the structure of DNA was one of the most significant biological milestones of the twentieth century, but it was not without controversy.

Chemist Rosalind Franklin began work on the structure of DNA in the early 1950's. Her area of expertise was making x-ray diffraction images that revealed the arrangement of atoms in molecules. Soon Franklin discovered key features of the structure of DNA such as the fact that there were two strands in DNA and that the bases were on the inside of the molecule. One x-ray diffraction image (photo 51) was shown by Franklin's colleague, Maurice Wilkins, to James Watson without her knowledge. Wilkins also shared Franklin's insights gained from the x-ray diffraction images with Watson. This information was critical to Watson and Francis Crick developing their model for the structure of DNA.

In acknowledgement of the discovery, Watson, Crick and Wilkins were all awarded the Nobel Prize for Medicine and Physiology in 1962. Franklin was not. She died from ovarian cancer at an age of 37 in 1956. Nobel prizes are not awarded posthumously, and no more than three people can be awarded a Nobel Prize for a discovery. Whether Franklin would have received the prize had she been alive has been the cause of much debate. The cause of the cancer was most likely the radiation she used to produce her images"

+++++++++++++++++++++++

TOK is one of the foundations of the IB program. It attempts to answer the question, "How do we know what we know?". Please join us in our class blog as we look at the issue in terms of whether Ms Franklin was appropriately acknowledged for her contribution to the understanding of DNA. The blog can be accessed here. Thanks, Doug

+++++++++++++++++++++++

Wednesday, November 10, 2010

PowerPoint

I have decided to have my students practice main idea and summary writing through PowerPoint presentations during a technology center in reading. I am hoping it is going to be very powerful and reinforce the skill of fiction summary writing. Keep your fingers crossed! Today was our first attempt. Mrs. Berry was so helpful and came over to co-teach with me in our computer lab! I think this is going to be an easy tool for the students to use and become well versed in. However, I was disappointed that by 3rd grade only four or five students out of twenty-eight had actually used PowerPoint before. My hopes is that with the continuation of the Global Learner program and our mission of 21st century learning that by 3rd grade students will have a handful of programs and media that they are well versed in! How amazing that would be! By the way, does anyone have any creative ideas/ways to practice summary writing?

Monday, November 8, 2010

Collaborative Blogging


Well, thanks to some help from Doug and some prodding from Kelly, my students are now publishing on a blog.  Collaborative Science Blog


I admit I am a total perfectionist and it took me a while to get up and running, but I think that it was well worthwhile. I think their writing needs some work, but this seems to be an excellent way to integrate writing into my content. Kelly came by in the morning class and helped me run the blog and then I ran it for the rest of the day with my 3 other science classes.

A little history on this blog..

I am trying to pattern my blog after Doug's IB blog where the students are applying their content knowledge to current issues, debating each other and engaging in a real dialogue via blogs... I wanted to do something similar to this and came across a video of the real water cycle made by the SurfRider foundation. It explores human impact on the water cycle. The assignment was students were to post a reaction to the video where they describe how humans impact the water cycle negatively and they were to provide a possible solution to the problem.

Now that they have done their part Doug is going to have his high school students follow up on the 6th grade posts and we will see how it goes from there.

One thing I have quickly realized is I need to figure out a way to post responses to each post (blogspot doesn't allow this natively but I can modify the code of the html to make this work) so that I can continue the discussion. I also need to figure out a way to make this process a continuing part of my science instruction.....

Wednesday, November 3, 2010

Edusymphonies

Kelly Buerster and I just finished a collaborative project for her 5th grade special ed students using what I have termed an "Edusymphony". It is tailored for a particular lesson with visuals and concepts/vocabulary set to original music. I am attaching the one we did for the story they read about whales. The students seem to love it and it really helps with building background knowledge.

Tuesday, November 2, 2010

World Wide Wiki

This month, I have decided to try creating a class wiki. I have wanted to do this for a long time and thought that if I wait any longer I will never get started. The response from students has been very positive. I have been finding united streaming videos that I can download to our wiki and then making cloze notes for students to fill out while they watch the videos. After they watch the video and take notes, there are some problems for them to try or links to websites that offer activities they can practice with. When they feel they are ready, there is a link to a zoomerang quiz on the skills they are working on. The preparation is taking me some time, but I think as I get more familiar with the wiki I will become quicker at preparing. I am hoping to get some student volunteers to help find activities and content to put on our wiki and that will help things as well.
There have been so many noticeable benefits of doing work on line. The students are definitely more engaged this first week of wiki madness. They are eager to log on to the site and I have had many students complete work at home or add to the wiki from home. They are also working together better. They are working with a partner and have to share the computer as well as discuss what they are learning as they watch the video and take notes. I am not lecturing as long as I used to and am not answering the same question over and over. I present a quick mini-lesson on the skills they will need for the days work and then show them what wiki pages they can find information on. While there have been many positive outcomes of working on the wiki, I am still trying to get students to think more academically when they post comments or talk to each other. They are very excited to have conversations, but so far not even half are really about the content we are working on. This is something we will have to keep working on. Please visit our wikis and comment on what students are saying and doing. They are: , , and

Technology Experiences for October

During the month of October, I learned how to use my webcam to video my students and then create a short video with the footage. It began with Kelly (thanks!) coming into my classroom to help me video a reader's theater my students were performing. We videoed pieces of each of the groups, then linked the pieces together so the whole play was performed in order, just with different groups performing the pieces. My class loved watching it, and they were really able to talk about how to improve their own fluency.
Next, I decided to video them as they presented their theme project. However, from each table group, they had to look at one another's visual aid and decided which one (or two) person (or people) would present to the class while being videoed. The elected students were videoed, and I made a short movie. The other students watched and took notes on what they thought made a great visual aid and presentation. We then took those notes and collaboratively created a visual aid and presentation rubric to be used in all future projects throughout the year. It was a very powerful experience for them, and I'm so excited to see their next round of projects!
From a teaching standpoint, this was all extremely easy and required almost no additional time for me to complete it. This is definately a use for technology I will be using frequently in my classroom!

Monday, November 1, 2010

Microsoft Publisher

This month the students used Microsoft Publisher to create 2 different flyers on patterns. One was called missing numbers. They had to create a short story of 3 numbers going missing and how you could use a pattern to find them. The second one dealt with creating their own word problem that involved patterns. I created a template for each one and they were very successful. It's a very easy program for the students to use and they enjoy it!

I started a wiki through wetpaint. The address is http://kmsmath6.wetpaint.com/. So far I have posted some of the student’s work. The students were very excited to see that their work was published. The 2nd project that we did, I had students ask me if their project was good enough to be posted. A few students that asked didn’t have all the requirements and went back to make changes. I am hoping to get the student blogging on this site also.

I might be creating a new website. If I do, hopefully this will be the last time! My mentor, Jesse Brown has started a wiki through pb works. He posts videos, games, online worksheets, and quizzes on this site. Each day the students come in to watch a video on a given topic and then do the assignment that goes with. He has found it to be easy to differentiate and engages more of the students. He has just started this but it seems to be great. So I will probably start one also!